07 Aug 2018
|
python
asyncio
queue
asyncio의 queue를 써보자!
asyncio는 비동기 프로그래밍을 위한 라이브러리이다. 모든 것을 정리하자니 귀찮아서 샘플 코드 하나로 끝낸다.
asyncio.ensure_future
loop에 schedule한다.coroutine을 future로 감싸서 return한다.
queue.put & queue.get
asyncio.get_event_loop
loop.add_reader(fd, callback)
fd의 변화를 감지해서 callback을 호출한다.
loop.run_until_complete(task or future)
인자로 들어온 task나 future가 끝나기 전까지 돈다.
실제로는 future.add_done_callback(_run_until_complete_cb)를 호출하며,
_run_until_complete_cb는 future._loop.stop()을 호출한다.즉 future가 끝나면 future가 실행되고있는 loop을 stop한다.
source code
loop.remove_reader(fd)
import asyncio
import sys
from functools import partial
def handle_stdin ( queue ):
data = sys . stdin . readline () . strip ()
if data == 'q' :
loop = asyncio . get_event_loop ()
loop . remove_reader ( sys . stdin )
asyncio . ensure_future ( queue . put ( data ))
async def tick ( queue ):
stop = False
while not stop :
data = await queue . get ()
print ( 'Data received: {}' . format ( data ))
if data == 'q' :
stop = True
print ( "tick finished." )
def main ():
queue = asyncio . Queue ()
loop = asyncio . get_event_loop ()
loop . add_reader ( sys . stdin , partial ( handle_stdin , queue ))
loop . run_until_complete ( tick ( queue ))
loop . close ()
if __name__ == '__main__' :
main ()
14 Jun 2018
|
ml
rl
Deep sarsa
DQN
Deep sarsa Demo
Grid Game with DeepSarsa
Deep Sarsa
epsilon: 1.0
random action
action from network
refresh rate:
데모를 먼저 보이는데, 아마 이 글을 다 읽고, 올라와서 봐도 학습이 안되어있을지도 모른다…
tensorflow js가 느린 것 같기도…
Review
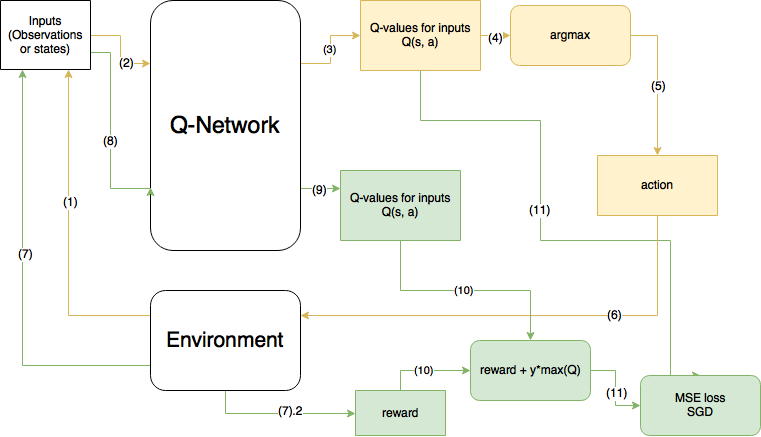
예전의 글에서 사진만 가져와서 살펴보면…
노란색이 현 step, 초록색이 다음 step을 의미한다.
이 그림은 DQN이며, 사실은 10번 계산에서 max(Q)가 아니라 prediction한 action의 Q값이 들어가야한다.
Code
대략적인 코드를 살펴보면 다음과 같다.
function train ( agent ) {
for ( var i_ep = 0 ; i_ep < num_ep ; i_ep ++ ){
env . initializeGame ();
data = env . data
while ( ! done ) {
action = agent . get_action ( state ) //(1)
next_state , reward , done = env . step ( translateAction ( action )) //(2)
next_action = agent . get_action ( next_state ) //(3)
agent . train_model ( state , action , reward , next_state , next_action , done ) //(4)
state = next_state
score += reward
}
}
}
state에 대한 action을 얻는다. (물론 epsilon에 따라서 랜덤한 액션이 나올 수 있다.)
다음 state와 reward, done을 environment에서 얻는다.
다음 state에 대한 다음 action을 얻는다.
위에 얻은 정보를 취합하여 model을 학습시킨다.
이제 4번의 train_model함수를 보면 다음과 같다.
train_model ( state , action , reward , next_state , next_action , done ) {
if ( this . epsilon > this . epsilon_min ) { //(1)
this . epsilon *= this . epsilon_decay
}
q_res = this . model . predict ( state ) //(2)
target_reward = this . model . predict ( next_state ) //(3)
target_reward = target_reward [ next_action ] //(4)
if ( done ){ //(5)
q_res [ action ] = reward
}
else {
q_res [ action ] = reward + this . discount_factor * target_reward
}
this . model . fit ( state , q_res , { epoch : 1 }) //(6)
}
epsilon 값을 점점 줄인다.
model에서 $Q(s_t,a_t)$를 뽑는다.
model에서 $Q(s_{t+1}, a_{t+1})$를 뽑는다
$Q(s_{t+1}, a_{t+1})$에서 next action에 해당하는 부분을 다음 reward로 생각
bellman 방정식에 맞게 계산하고..
mse로 학습하면 끝!
14 Jun 2018
|
ml
rl
Deep sarsa
DQN
요 글에 나오는 gridworld와 강화학습 예제를 보고싶다면 gridworld_tfjs 에서 받아서 돌려볼 수 있다.
Grid world 소개
Grid Game
마우스로 클릭하거나 키보드로 조종해볼 수 있다.
Deep sarsa를 다음 블로그 글에 올리며, DQN은 생략한다. include하는데 너무 귀찮아서..
25 Apr 2018
|
python
BytesIO
OpenCV
PIL
데모를 만들거나 할 때, bytesio를 써서 쉽게쉽게 연동하고싶은데, 맨날 까먹어서 정리해놓는다.
OpenCV 이미지와 bytesio 연동
from io import BytesIO
img = cv2 . imread ( "../Documents/3.jpg" )
img . shape # (438, 763, 3)
type ( img ) # <class 'numpy.ndarray'>
img . dtype # dtype('uint8')
# 둘 다 가능
img_str = cv2 . imencode ( '.jpg' , img )[ 1 ] . tostring ()
type ( img_str ) #<class 'bytes'>
img_str = cv2 . imencode ( '.jpg' , img )[ 1 ] . tobytes ()
type ( img_str ) #<class 'bytes'>
bytesio = BytesIO ( img_str )
PIL image와 bytesio 연동
from io import BytesIO
from PIL import Image , ImageDraw
image = Image . new ( "RGB" , ( 300 , 50 ))
draw = ImageDraw . Draw ( image )
draw . text (( 0 , 0 ), "This text is drawn on image" )
byte_io = BytesIO ()
image . save ( byte_io , 'PNG' ) # 여기는 filename이나 file object 둘 다 가능하다.


 —(a)
—(a)


