17 Oct 2017
|
tensorflow
bayesian inference
optimization
문서 내용
여기서는 GPyOpt와 tensorflow를 사용하여, ML Model의 parameter를 최적화하는 실험을 한다.
- Data: MNIST
- Model: FNN Model
- input: 784-dim
- output: 10-dim
- parameter
- learning-rate (0.01, 0.5)
- layer 수 {2, 3}
- hidden_size {30, 60}
- batch_size {500, 1000, 2000}
tensorflow model with score
여기서는 먼저 tensorflow model을 만든다. Bayesian Optimization는 model을 학습하고 결과를 받는 함수를 objective function으로 생각하기 때문에 accuracy에 -를 취해주어야 한다.
TODO: Objective function의 scale에 따라서 다르게 최적화가 되는지… 알아봐야할 듯!
import tensorflow as tf
import numpy as np
import matplotlib.pyplot as plt
from tensorflow.examples.tutorials.mnist import input_data
mnist = input_data.read_data_sets('../MNIST_data', one_hot=True)
Extracting ../MNIST_data/train-images-idx3-ubyte.gz
Extracting ../MNIST_data/train-labels-idx1-ubyte.gz
Extracting ../MNIST_data/t10k-images-idx3-ubyte.gz
Extracting ../MNIST_data/t10k-labels-idx1-ubyte.gz
def objective_function(args):
    '''
    args[0] : layer 개수
    args[1] : hidden size
    '''
    lr_rate = args[0, 0]
    num_layer = args[0, 1].astype(int)
    output_size = args[0, 2].astype(int)
    batch_size = args[0, 3].astype(int)


    print("실험 시작\nargs: {}".format(args))
    # reset graph
    tf.reset_default_graph()

    x = tf.placeholder(tf.float32, shape=[None, 784])
    y_ = tf.placeholder(tf.float32, shape=[None, 10])

    input_size = 784
    remain_num_layer = num_layer-1

    new_x = x  # feed_dict에 x로 들어가기 위해서...
    for i in range(remain_num_layer):
        W = tf.Variable(tf.random_normal([input_size, output_size]))
        b = tf.Variable(tf.random_normal([output_size]))
        new_x = tf.nn.relu(tf.matmul(new_x, W) + b)
        input_size = output_size

    W = tf.Variable(tf.random_normal([input_size, 10]))
    b = tf.Variable(tf.random_normal([10]))

    y = tf.matmul(new_x, W) + b
    cross_entropy = tf.reduce_mean(tf.nn.softmax_cross_entropy_with_logits(labels=y_,
                                                                           logits=y))

    global_step = tf.Variable(0, trainable=False)

    lr_rate_decayed = tf.train.exponential_decay(lr_rate,
                                                 global_step,
                                                 10,
                                                 0.99,
                                                 staircase=True)
    train_step = tf.train.GradientDescentOptimizer(lr_rate_decayed).minimize(cross_entropy)

    acc = [0]
    with tf.Session() as sess:
        sess.run(tf.global_variables_initializer())

        for i in range(1000):
            batch = mnist.train.next_batch(batch_size)
            train_step.run(feed_dict={x: batch[0], y_: batch[1]})

            correct_prediction = tf.equal(tf.argmax(y,1), tf.argmax(y_,1))
            accuracy = tf.reduce_mean(tf.cast(correct_prediction, tf.float32))
            if i % 50 is 0:
                new_acc = accuracy.eval(feed_dict={x: mnist.test.images, y_: mnist.test.labels})
                print("중간 결과: {}".format(new_acc))
                if abs(new_acc - acc[-1]) < 0.0001: #효과가 별로 없으면
                    break
                else:
                    acc.append(new_acc)

        accuracy = tf.reduce_mean(tf.cast(correct_prediction, tf.float32))

        acc = accuracy.eval(feed_dict={x : mnist.test.images,
                                       y_: mnist.test.labels})
        print("실험 하나 종료! 결과\nargs: {}, acc: {}".format(args, acc))
        return 1 - acc  # fMin이기 때문에...
Bayesian Optimization
위 코드 마지막을 보면 1-acc로 accuracy에 마이너스를 취해줬지..
이제 다음 코드로 Bayesian Optimization을 하면 끝!
from GPyOpt.methods import BayesianOptimization
import numpy as np

# continuous가 discrete 앞에 위치해야함! BUGBUG!! https://github.com/SheffieldML/GPyOpt/issues/85
domain = [{'name': 'lr_rate',
          'type': 'continuous',
          'domain': (0.01, 0.5),
           'dimensionality': 1},
          {'name': 'num layer',
           'type': 'discrete',
           'domain':(2, 3),
           'dimensionality': 1},
          {'name': 'hidden size',
           'type': 'discrete',
           'domain': (30, 60),
           'dimensionality': 1},
          {'name': 'batch size',
           'type': 'discrete',
           'domain': (500, 1000, 2000),
           'dimensionality': 1}]

# --- Solve your problem
myBopt = BayesianOptimization(f=objective_function,
                              domain=domain,
                              initial_design_numdata=5)
myBopt.run_optimization(max_iter=15)
myBopt.plot_acquisition()
실험 시작
args: [[  3.27519352e-01   3.00000000e+00   6.00000000e+01   1.00000000e+03]]
중간 결과: 0.11749999970197678
...
중간 결과: 0.8468000292778015
중간 결과: 0.8496000170707703
실험 하나 종료! 결과
args: [[   0.5    2.    30.   500. ]], acc: 0.8436999917030334
결과 보기
다음 코드로 결과를 확인할 수 있다.
print(myBopt.x_opt)  # lr_rate, #layer, hidden_size, batch_size

N, _ = myBopt.X.shape
for i in range(N):
    if np.array_equal(myBopt.x_opt, myBopt.X[i, :]):
        print(1 - myBopt.Y[i,:])  # accuracy 변환
[  2.72432763e-01   2.00000000e+00   6.00000000e+01   2.00000000e+03]
[ 0.87239999]
부록
# 돌릴 필요는 없고 참고삼아...
args = np.array([[2, 10, 500, 0.3]])
objective_function(args)
13 Oct 2017
|
ml
dimension reduction
이론적 배경
Stochastic Neighbor Embedding(SNE)
고차원 원공간에 존재하는 데이터 x의 이웃간의 거리를 최대한 보존하는 저차원의 y를 학습하는 방법론
- 원래의 고차원 공간에 존재하는 i번째 object가 주어졌을 때, j번째 object가 선택될 확률
- 저차원의 공간에서 i번째 object가 주어졌을 때, j번째 object가 선택될 확률
SNE는 위 두 확률이 비슷해지면 저차원이 잘 모델링된다고 가정을 한다. 확률의 비슷함은 당연히 KL divergence!
그래서 다음 식을 최소화시키도록 학습을 한다.
t-SNE
- SNE에서 $\sigma_i$는 원래 dense한 곳에서는 작고, sparse한 곳에서는 크게 하려고 했는데, 상수로 고정하여도 성능에 큰 차이가 없었음.
- $p_{i\vert j}$와 $p_{j\vert i}$를 같이 놓고 풀어도 성능이 그리 나쁘지 않았음.
- 그래서 다시 계산하면
-
- 요리 나온다. 이거는 유도해보지 않았고… 어차피 gradient descent로 풀어버리니까…
- gaussian은 꼬리가 얇아서 적당히 떨어진 것과 멀리 떨어진 것의 확률이 모두 작다.(crowding problem) 그래서 $q_{ij}$에 대해서 t-분포를 사용했음.
실제 쓸 때 필요한 정보
요거 쓰면 빠른데 dimension이 2일때만 된다…ㅠㅠ
multicore-TSNE 이 코드를 받아서 써야한다.
scikit-learn의 t-sne와 여러 다른 t-sne 구현체에 대해서 [40164 x 512]로 실험했는데 다들 잘 안나온다. 심지어 segfault까지 나옴.. 요놈을 가져다 쓰자!
10분안에 끝남 (다른 녀석들은 몇시간 기다려도 안됨 ㅠ)
from MulticoreTSNE import MulticoreTSNE as TSNE
import numpy as np

def normalize_data(d):
    row_sums = d.sum(axis=1)
    return (d.T / row_sums).T

tsne = TSNE(n_jobs=16, metric="cosine")  # 16코어, cosine metric
emb = np.load("testKrEn/en_pair.npy")
emb2 = emb.astype(np.double)
Y = tsne.fit_transform(emb2)
np.save("out_2.npy", Y)
Y_norm = normalize_data(Y)
np.save("out_norm_2.npy", Y_norm)
http://techfly.top/2017/03/09/machine_learning_tensorflow_tsne_data_nonlinear_dimensionality_reduction/
요거 보고 구현해봐야하나…ㅠㅠ
https://github.com/maestrojeong/t-SNE/blob/master/t-SNE.ipynb
01 Sep 2017
|
python
thread
threading
| Object |
Description |
| Thread |
thread 객체 |
| Lock |
기본 lock 객체 |
| RLock |
재진입 가능한 lock 객체 |
| Condition |
다른 쓰레드의 신호를 기다리는 condition 변수 객체 |
| Event |
컨디션의 일반화 버젼 |
| Semaphore |
세마포어 |
| BoundedSemaphore |
초기값 이상으로 증가할 수 없는 세마포어 |
| Timer |
지정된 시간동안 대기하고 실행되는 thread |
| Barrier |
thread가 계속 진행되려면 지정된 숫자의 thread가 해당 지점까지 도달해야함 |
Thread class
| method/attribute |
Description |
daemon |
daemon thread인지.. |
__init__ |
초기화 |
start() |
thread 실행 |
run() |
thread의 기능을 담당 |
join(timeout=None) |
thread가 종료될 때까지 대기한다 |
예제
함수를 넘김
import threading
from time import sleep, ctime

loops = [3, 1]

def loop(nloop, nsec):
    print('start loop {} at: {}'.format(nloop, ctime()))
    sleep(nsec)
    print('loop {} at: {}'.format(nloop, ctime()))


def test() :
    print('starting at: {}'.format(ctime()))
    threads = []
    nloops = range(len(loops))

    for i in nloops:
        t = threading.Thread(target=loop,
                             args=(i, loops[i]))
        threads.append(t)

    # thread들을 모두 실행시킨다.
    for i in nloops:
        threads[i].start()

    # thread들을 모두 join
    for i in nloops:
        threads[i].join()

    print('all Done at: {}'.format(ctime()))

if  __name__ == '__main__' :
   test()
결과 :
starting at: Fri Sep  1 17:06:49 2017
start loop 0 at: Fri Sep  1 17:06:49 2017
start loop 1 at: Fri Sep  1 17:06:49 2017
loop 1 at: Fri Sep  1 17:06:50 2017
loop 0 at: Fri Sep  1 17:06:52 2017
all Done at: Fri Sep  1 17:06:52 2017
상속을 통해서
import threading
from time import sleep, ctime

loops = [3,1]

class MyThread(threading.Thread):
    def __init__(self, args, name=''):
        threading.Thread.__init__(self, name=name)
        self.args = args

    def run (self):
        print('start loop: {} at: {}'.format(self.args[0], ctime()))
        sleep(self.args[1])
        print('done loop: {} at: {}'.format(self.args[0], ctime()))


def test() :
    print('starting at: {}'.format(ctime()))
    threads = []
    nloops = range(len(loops))

    for i in nloops:
        t = MyThread((i, loops[i]),
                     'loop')
        threads.append(t)

    for i in nloops:
        threads[i].start()

    for i in nloops:
        threads[i].join()

    print('all Done at: {}'.format(ctime()))

if  __name__ == '__main__' :
   test()
결과 :
starting at: Fri Sep  1 17:14:36 2017
start loop: 0 at: Fri Sep  1 17:14:36 2017
start loop: 1 at: Fri Sep  1 17:14:36 2017
done loop: 1 at: Fri Sep  1 17:14:37 2017
done loop: 0 at: Fri Sep  1 17:14:39 2017
all Done at: Fri Sep  1 17:14:39 2017
Condition
Contition 객체를 사용하는 예제를 적는다.
여기서 with statement를 쓰는 것을 볼 수 있는데…
with some_lock:
    # do something...
는
some_lock.acquire()
try:
    # do something...
finally:
    some_lock.release()
과 동치라고 한다. python 3부터 그런가보다..
밑의 예제는 하나씩 notify를 하는 것을 만들어보았고 notify_all()로 한번에 끝낼 수도 있다.
import threading
import time
import logging

logging.basicConfig(level=logging.DEBUG,
                    format='(%(threadName)-9s) %(message)s')

def consumer(cv):
    logging.debug('start')
    with cv:
        logging.debug('waiting')
        cv.wait()
        logging.debug('consumed the resource')

def producer(cv):
    logging.debug('start')
    with cv:
        logging.debug('produce a resource')
        cv.notify()

    logging.debug('sleep 4 seconds')
    time.sleep(4)
    with cv:
        logging.debug('produce a resource')
        cv.notify()

if __name__ == '__main__':
    condition = threading.Condition()
    cs1 = threading.Thread(name='consumer1', target=consumer, args=(condition,))
    cs2 = threading.Thread(name='consumer2', target=consumer, args=(condition,))

    pd  = threading.Thread(name='producer',  target=producer, args=(condition,))

    cs1.start()
    cs2.start()
    time.sleep(1)
    pd.start()
결과 :
(consumer1) start
(consumer1) waiting
(consumer2) start
(consumer2) waiting
(producer ) start
(producer ) produce a resource
(producer ) sleep 4 seconds
(consumer1) consumed the resource
(producer ) produce a resource
(consumer2) consumed the resource
04 Jul 2017
|
ml
normalization
Layer Normalization
Introduction
- Batch Normalization
- input statistics의 running average를 필요로함
- RNN의 경우 time-step마다 다른 statistics를 적용해야함
- distributed training에서는 minibatch가 너무 작아서 적용이 힘듬
Background
- $a_i^l$: l번째 layer의 i번째 hidden unit
- $w_i^l$: parameter
- $b_i^l$: bias parameter
라고 하면
다음과 같이 수식화할 수 있다.
문제점: 한 layer의 weight들에 대한 gradient는 전 layer의 output에 높게 관여된다. internal covariate shift: 그런데 전 layer의 output이 계속 distribution이 바뀌니까 트레이닝이 느리다. BN 설명 블로그
그래서 Batch-normalization에서는 위에서 말한 internal covariate shift를 줄이기 위해
- batch에 대해서 각 dimension마다 mean, variance를 구하여 normalization하고 (각 dim은 independent하다고 가정)
- linear transform을한다. (실제 independent하진 않을테니..)
- 그리고 linear transform도 같이 트레이닝
근데 위에서 $\sigma$와 $\mu$는 batch의 distribution으로 근사시켜서 구하는데, 이는 실제 distribution과 다르다. 그래서 작은 batch보다는 큰 batch가 좋다.
Layer Normalization
- hidden unit들에 대해서 mean과 variance를 구함
- batch size에 관계없으므로
- training, test시에도 따로 구할 것이 없음
- RNN에도 좋음
13 Jun 2017
|
ml
nmt
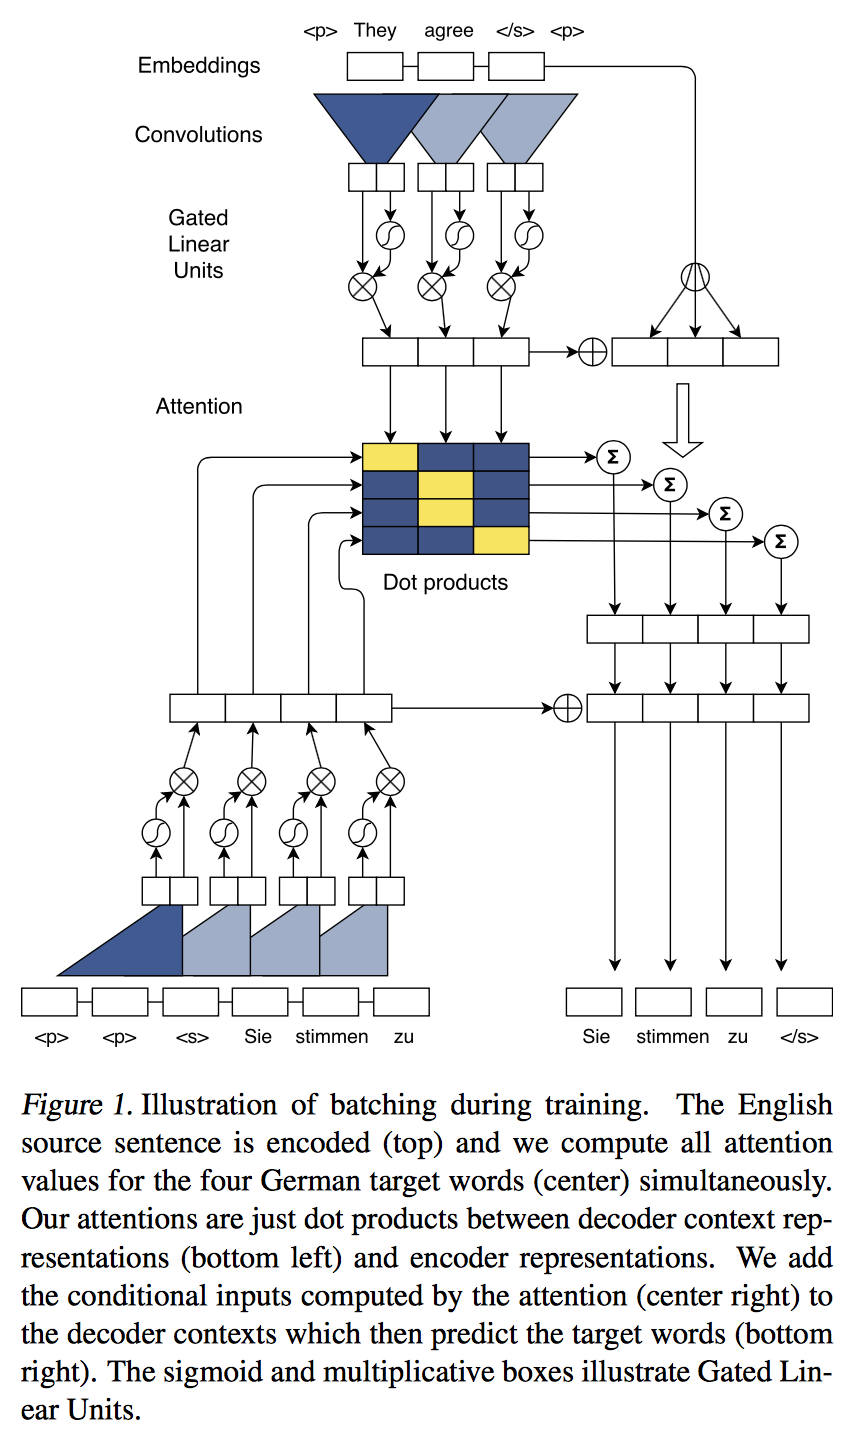
사실 이 논문을 보다가 구글에서 나온 transformer때문에 모두 정리하지는 못했다…
Abstract
training 시에 전부 parallelize!
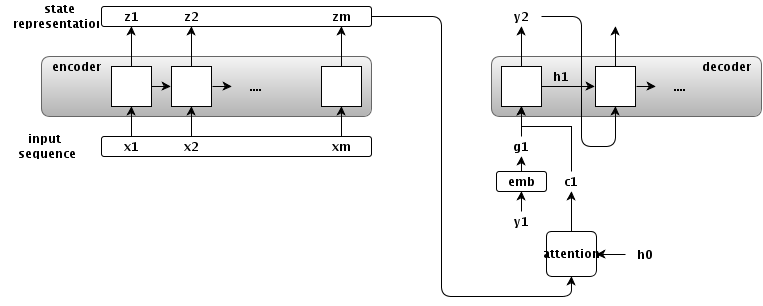
2. Recurrent Sequence to Sequence Learning
여기서는 기존의 RNN을 사용한 seq2seq structure를 간단히 다룬다.
Overview
 정확하게는 $h_0$ -> $h_1$으로 바꾸는게 맞겠다… 감안하고 보자!
encoder
- input sequence
- $\textbf{x} = (x_1, …, x_m)$
- state representations
- $\textbf{z} = (z1, …, z_m)$
- input time-step : $m$
attention
- conditional input(attention output)
- $c_i = f(\textbf{z}, h_i)$
- 의미 : 각 time-step의 state representation과 $i$번째 decoder의 state의 함수로 conditional output을 만들겠다.
- attention을 쓰지 않는 seq2seq 모델의 일반화
- $c_i = z_m$ for all $i$
- $c_i = None$, $h_0 = z_m$
- encoder의 마지막 state를 decoder의 첫 input으로..
decoder
- output sequence
- $\textbf{y}=(y_1, …, y_n)$
- hidden state
- $h_i$ : decoder의 $i$번째 hidden state
- embedding
- $g_i$ : $y_i$의 embedding.
- $y_{i+1}$을 만들려면…
- $h_{i+1}$을 만들어야함
- $h_i$ 가져오고
- $y_i$로 $g_i$를 만들고,
- $\textbf{z}$로 $c_i$를 만든다.
- 위 세개로 $h_{i+1}$을 만든다.
- 그 후엔 쉽지…
3. A Convolutional Architecture
이제 논문에서 주장하는 $\textbf{h}, \textbf{z}$를 CNN으로 계산하는 방법으로 넘어가보자!
3.1 Position Embeddings
- embedding matrix $\textbf{D}$
- $\textbf{D} \in \textbf{R}^{V \times f}$
- 변환: $\textbf{x} = (x_1,…,x_m)$ -> $\textbf{w}=(w_1, …, w_m)$
- $w_j \in \textbf{R}^{f}$ 는 $\textbf{D}$의 한 row
- absolute position embedding $\textbf{p}$
- $\textbf{p}=(p_1, …, p_m)$
- $p_j \in \textbf{R}^{f}$
- input element representation $\textbf{e}$
- 위 두개를 사용함
- $\textbf{e}=(w_1+p_1, …, w_m+p_m)$
absolute position embedding에 관한 내용이 제대로 안나와있다… 나중에 추가해야할 듯!
3.2 Convolutional Block Structure
- encoder와 decoder는 서로 block structure를 공유한다.
- 고정된 사이즈의 input element들로 중간 state들을 계산.
- $l$번째 block을 다음처럼 표기함
- encoder network : $\textbf{z}^l\ =\ (z^l_1,\ …,\ z^l_m)$
- decoder network : $\textbf{h}^l\ =\ (h^l_1,\ …,\ h^l_n)$
- 하나의 block은 1D의 convolution + non-linear func로 이루어짐
- block을 쌓으면 state가 표현하는 input element의 갯수가 증가
- 6개를 쌓으면 25개의 input을 하나의 state로 나타냄
Block
- convolutional kernel
- parameters
- $W \in \textbf{R}^{2d \times kd}$
- $b_w \in \textbf{R}^{k \times d}$
- input
- $X \in \textbf{R}^{k \times d}$
- $d$ 사이즈로 embedding된 $k$개의 input
- output
- GLU(Gated Linear Unit)
- $\nu([A\ B]) = A * \sigma(B)$
- 그래서 결국 $R^d$
- Residual connection


 정확하게는 $h_0$ -> $h_1$으로 바꾸는게 맞겠다… 감안하고 보자!